WeChat mini program
Overview and resources
The WeChat mini program plug-in is similar to a web plug-in, and the server-side deployment needs to be completed first. This part describes the process of using the plug-in of the GeeTest mini program;
the configuration parameters in the document and the API method demo can be obtained on GitHub (demo address).
| Item | Description |
|---|---|
| Product Name | GeeTest CAPTCHA v4 |
| Developer | Wuhan Jiyi Network Technology Co., Ltd. |
| Latest Version (JS) | v2.7.5 |
| Latest Release Date | 2024/8/26 |
| Main Function | The latest generation of CAPTCHA offers smarter solutions to address business losses and security risks caused by automated script/bot attacks. |
| Privacy Policy | GeeTest CAPTCHA v4 Privacy Policy |
| Compliance Guide | GeeTest CAPTCHA v4 Compliance Guide |
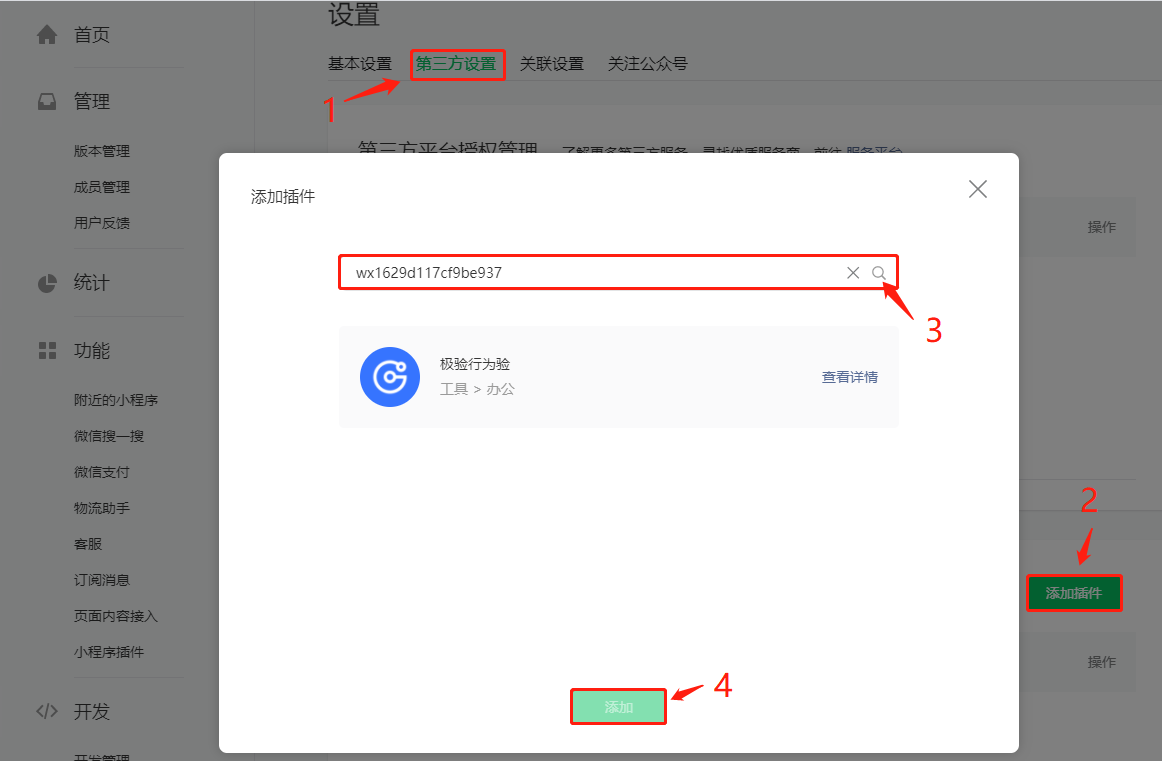
| Resource Links | Before using plug-ins, you should first add plug-ins in “Settings-Third Party Services-Plug-in Management” in the background of the mini program management. Developers can log in to the mini program management background, find and add captcha plug-ins through appid (wx1629d117cf9be937), and wait for GeeTest to approve the application.  |
Environmental requirements
| Item | |
|---|---|
| Development tool | WeChat developer tool |
| Debug base library | 2.10.4 and above |
Installation
Preparation
Server side deployment needs to be done first, see (server deployment documentation)
Plug-in application
Before using plug-ins, you should first add plug-ins in “Settings-Third Party Services-Plug-in Management” in the background of the mini program management.
Developers can log in to the mini program management background, find and add captcha plug-ins through appid (wx1629d117cf9be937), and wait for GeeTest to approve the application.

Plug-in package introduction
Before using plug-ins in the page, you need to declare the plug-ins you need to use in the project app.json.
It is recommended to use the latest version of the plug-in. The latest version viewing method: WeChat Developer Tools-> Details-> Basic Information-> Plug-in Information
Code sample:
{ |
Use plug-in
The method of using plug-ins is similar to that of ordinary custom components. Use the plugin:// protocol to indicate the reference name of the plug-in and the name of the custom component when defining the custom component to be introduced in the page .json file.
Code sample:
{ |
Template insertion
Insert captcha4 template in wxml; the parameters in the example are required parameters, and refer to the API documentation for other extended parameters.
Code sample:
<captcha4 id="captcha" wx:if="{{loadCaptcha}}" captchaId="{{captchaId}}" bindSuccess="captchaSuccess" /> |
Initialization
When you need to render the plug-in, use setData to pass in the necessary parameters to initialize.
Code sample:
onLoad: function() { |
Obtain a success certificate
After the captcha is successfully completed, the user-defined captchaSuccess function will be triggered, and the verification result will be stored in the result (where the user can customize it), which will be extracted and uploaded when waiting for the second verification.
Code sample:
captchaSuccess:function(result){ |
Secondary validation
The user clicks the submit button to trigger submission for secondary validation.
Code sample:
captchaValidate: function(){ |
Configuration parameters
Configuration parameter here refers to the value passed in when setData is called during initialization.
The following are the required parameters, which are recommended to be filled in according to the above sample code:
| Parameters | Type | Description |
|---|---|---|
| captchaId | String | Verify the id, and apply for GeeTest in the background |
| loadCaptcha | Boole | Parameters that control the display and hiding of plug-ins |
Developers only need to pass in these configuration parameters returned by the server SDK as shown in the demo.
These are the parameters that must be configured. For optional configuration parameters, refer to the parameter configuration of MiniProgram API.

