概述
DeepKnow iOS SDK提供给集成iOS原生客户端开发的开发者使用, SDK不依赖任何第三方库。
产品依赖DeepKnowSDK.framwork,部署前请引入deepknow相关服务,请参考深知_ios部署方案
环境需求
| 条目 |
描述 |
| 开发目标 |
iOS8+ |
| 开发环境 |
Xcode 9.0 |
| 测试环境 |
真机 |
| 产品依赖 |
DeepKnowSDK.framwork |
| sdk三方依赖 |
无 |
获取SDK
点击下载SDK资源
导入SDK到项目工程并配置开发环境
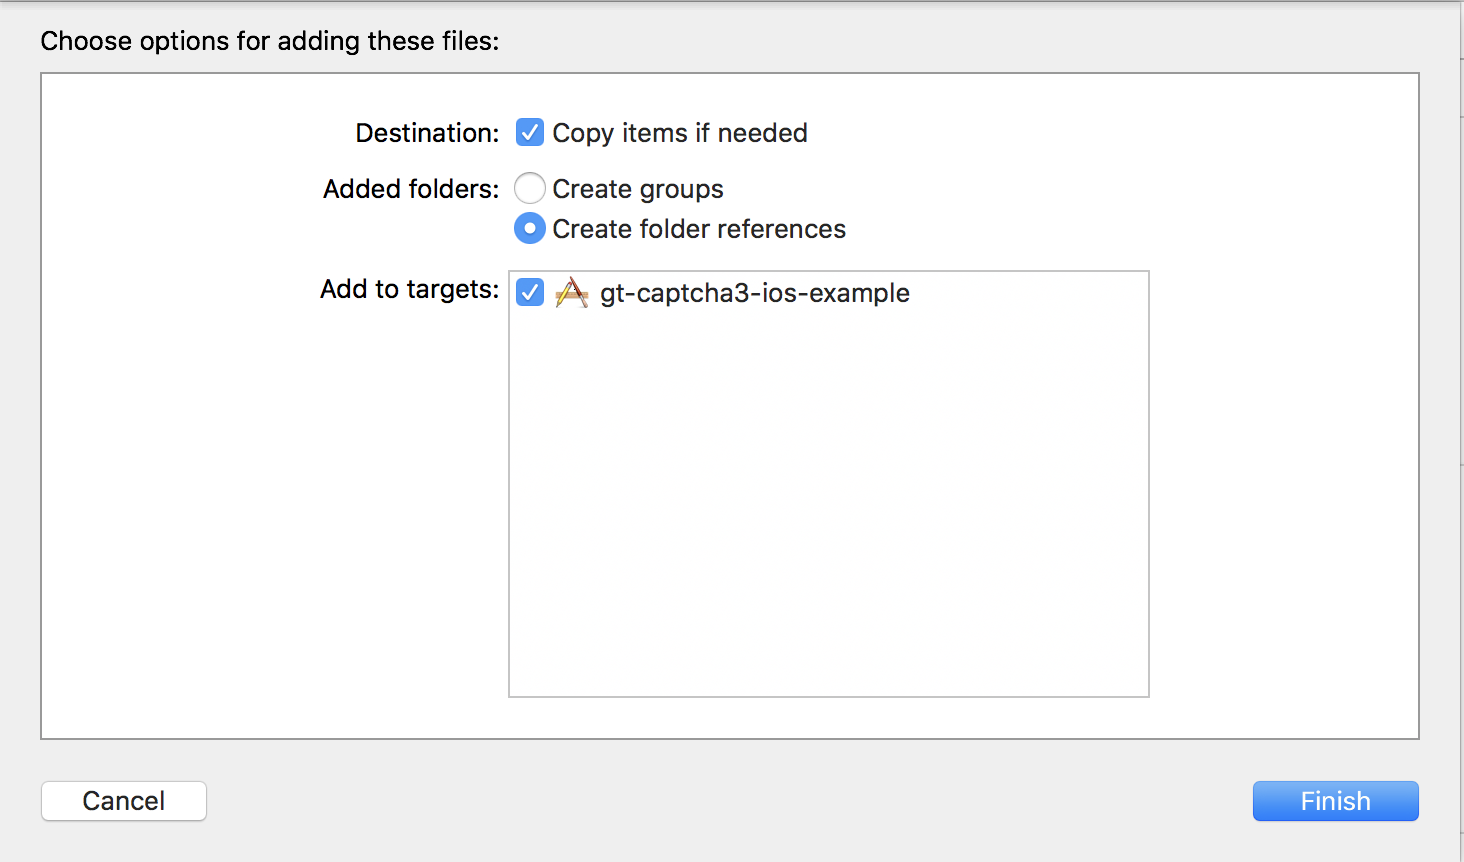
如果您是手动添加SDK, 将下载获取的DeepKnowSDK.framework, SenseBotSDK.framework、SenseBotSDK.bundle文件拖拽到工程中, 确保Copy items if needed已被勾选, 且确保路径在PROJECT -> Build Phases -> linked Frameworks and Libraries下。
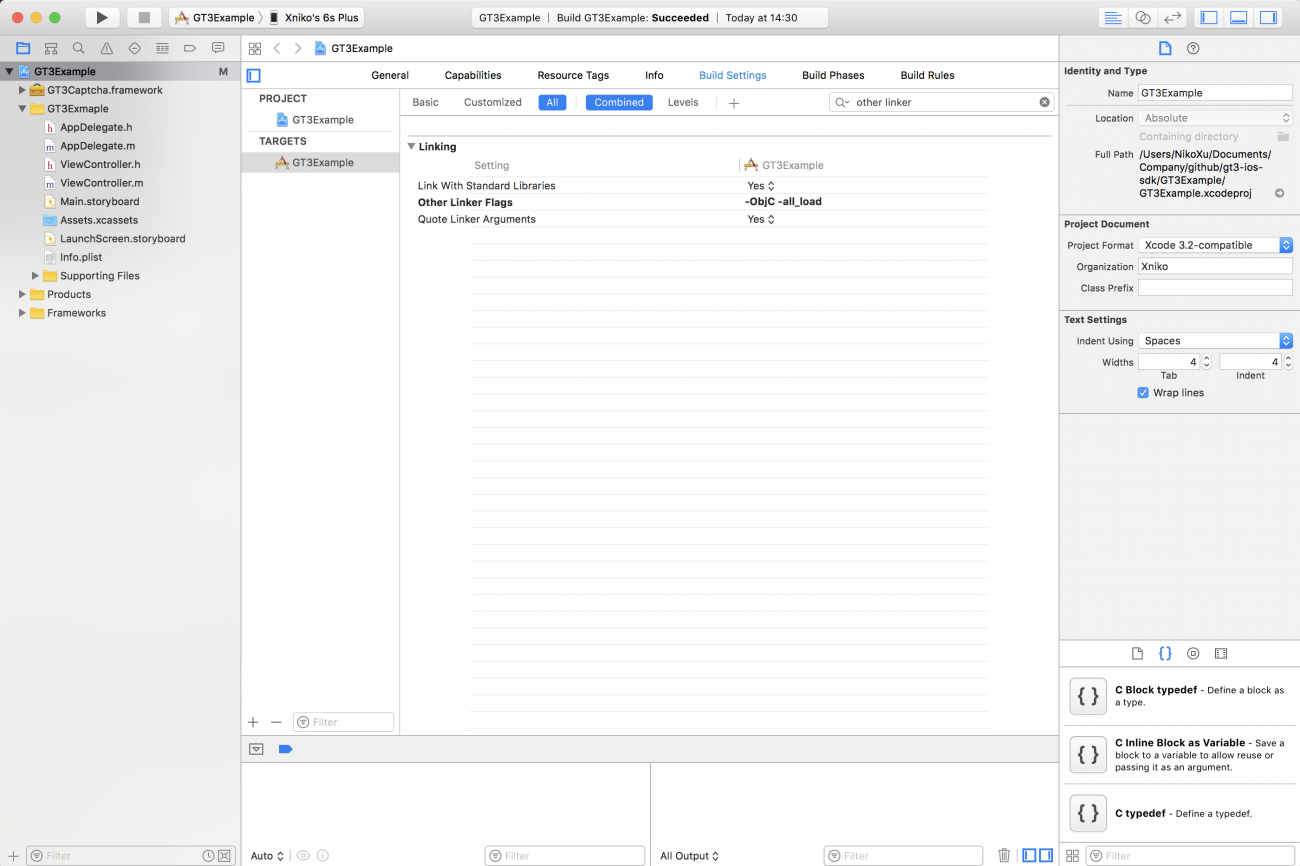
针对静态库中的Category, 需要在对应target的Build Settings->Other Linker Flags添加-all_load编译选项。建议先添加-ObjC,如果依然有问题,再添加-all_load。
配置接口
集成用户需要使用iOS SDK完成提供的以下接口:
- 初始化管理
- 启动管理器
集成代码参考下方的代码示例
编译并运行你的工程
编译你的工程, 体验畅快体验SenseBot!

代码示例
初始化
- 启动DeepKnow
在工程中的AppDelegate.m文件头部引入动态库<DeepKnowSDK/DeepKnowSDK.h>
#import <DeepKnowSDK/DeepKnow.h>
|
在AppDelegate.m中的UIApplicationDelegate的代理方法里初始化和启动DeepKnow
- (BOOL)application:(UIApplication *)application didFinishLaunchingWithOptions:(NSDictionary *)launchOptions {
DeepKnow *deepknow = [DeepKnow sharedInstance];
[deepknow start];
return YES;
}
|
至此, DeepKnow已在您的应用中启动。
- 在相应的
UIViewController中初始化SenseBot
#import <DeepKnowSDK/DeepKnow.h>
#import <SenseBotSDK/SenseBot.h>

@interface ViewController () <SenseBotDelegate>

@property (nonatomic, strong) SenseBot *senseBot;

@end

@implementation ViewController

- (void)viewDidLoad {
    [super viewDidLoad];
    self.view.backgroundColor = [UIColor whiteColor];
    self.dpEventAlias = @"login";

    self.senseBot = [[SenseBot alloc] init];
    self.senseBot.delegate = self;
    [self.senseBot useAnimatedAcitvityIndicator:nil withInitialSize:CGSizeMake(100, 100) indicatorType:SEIndicatorTypeSystem];
    [self.senseBot disableSecurityAuthentication:YES];
}

@end
|
至此, DeepKnow已在您的应用中启动。
验证事件发生
给关键场景的视图控制页设置标签
在相应控制页的文件中#import <DeepKnowSDK/DeepKnowSDK.h>, 然后在UIViewController的生命周期中设置DeepKnow场景事件别名
一般用于标记核心控制页面, 比如活动等。 手动设置后, DeepKnowSDK会自动添加的控制页面标签到相应的数据里。
#import <DeepKnowSDK/DeepKnowSDK.h>

...

- (void)viewDidLoad {
    [super viewDidLoad];

    self.dpEventAlias = @"this is a KEY Event";

    ...
}
|
推荐在viewDidLoad处理
提交场景事件的描述以获得调用验证需要的参数
事件发生时, 需要将当前的SenseData数据提交到极验服务器
以登录事件举例
#import <DeepKnowSDK/DeepKnowSDK.h>
#import <SenseBotSDK/SenseBot.h>
@interface ViewController () <SenseBotDelegate>
@property (nonatomic, strong) SenseBot *senseBot;
@end
- (void)viewDidLoad {
[super viewDidLoad];
self.dpEventAlias = @"login";
[self createSenseDataButton];
...
}
- (void)createSenseDataButton {
UIButton *button = [[UIButton alloc] initWithFrame:CGRectMake(20, 96, 72, 44)];
button.backgroundColor = [UIColor blackColor];
button.layer.cornerRadius = 3;
button.titleLabel.text = @"登录";
[button addTarget:self action:@selector(login) forControlEvents:UIControlEventTouchUpInside];
[self.view addSubview:button];
}
- (void)login {
...
[[DeepKnow sharedInstance] emitRecentSenseDataWithGTID:@"<!-----申请gt_id-----!>"
interactive:1
attribution:@{@"gender" : @"male", @"member" : @"false"}
completionHandler:^(NSDictionary * _Nullable dict, NSError * _Nullable error) {
if (dict && !error) {
NSLog(@"dict: %@", dict.description);
SEIntent *intent = [[SEIntent alloc] initWithDict:dict];
if (intent && [intent.product isEqualToString:@"sensebot"]) {
[self.senseBot showWithIntent:intent animated:YES];
}
else {
NSLog(@"dict: %@", dict.description);
}
}
else {
NSLog(@"error: %@", error.userInfo);
}
}];
}
|
处理SenseBot返回结果
遵循SenseBotDelegate代理, 处理验证返回的结果和错误
@interface ViewController () <SenseBotDelegate>

@property (nonatomic, strong) SenseBot *senseBot;

@end

@implementation ViewController

...

- (void)senseBotDidReceiveResponse:(SEResponse *)response withError:(SEError *)error {
    NSLog(@"error %@", error.seDescription);
    if (response && [response.code isEqualToString:@"1"]) {
        NSLog(@"result: %@", response.result);

       // TODO
       // 请进行二次校验
    }
    else if (error) {
        // error 处理
    }
}

@end
|
概述
DeepKnow iOS SDK提供给集成iOS原生客户端开发的开发者使用, SDK不依赖任何第三方库。
产品依赖DeepKnowSDK.framwork,部署前请引入deepknow相关服务,请参考深知_ios部署方案
环境需求
| 条目 |
描述 |
| 开发目标 |
iOS8+ |
| 开发环境 |
Xcode 9.0 |
| 测试环境 |
真机 |
| 产品依赖 |
DeepKnowSDK.framwork |
| sdk三方依赖 |
无 |
获取SDK
点击下载SDK资源
导入SDK到项目工程并配置开发环境
如果您是手动添加SDK, 将下载获取的DeepKnowSDK.framework, SenseBotSDK.framework、SenseBotSDK.bundle文件拖拽到工程中, 确保Copy items if needed已被勾选, 且确保路径在PROJECT -> Build Phases -> linked Frameworks and Libraries下。
针对静态库中的Category, 需要在对应target的Build Settings->Other Linker Flags添加-all_load编译选项。建议先添加-ObjC,如果依然有问题,再添加-all_load。
配置接口
集成用户需要使用iOS SDK完成提供的以下接口:
- 初始化管理
- 启动管理器
集成代码参考下方的代码示例
编译并运行你的工程
编译你的工程, 体验畅快体验SenseBot!
代码示例
初始化
- 启动DeepKnow
在工程中的AppDelegate.m文件头部引入动态库<DeepKnowSDK/DeepKnowSDK.h>
#import <DeepKnowSDK/DeepKnow.h>
|
在AppDelegate.m中的UIApplicationDelegate的代理方法里初始化和启动DeepKnow
- (BOOL)application:(UIApplication *)application didFinishLaunchingWithOptions:(NSDictionary *)launchOptions {
DeepKnow *deepknow = [DeepKnow sharedInstance];
[deepknow start];
return YES;
}
|
至此, DeepKnow已在您的应用中启动。
- 在相应的
UIViewController中初始化SenseBot
#import <DeepKnowSDK/DeepKnow.h>
#import <SenseBotSDK/SenseBot.h>

@interface ViewController () <SenseBotDelegate>

@property (nonatomic, strong) SenseBot *senseBot;

@end

@implementation ViewController

- (void)viewDidLoad {
    [super viewDidLoad];
    self.view.backgroundColor = [UIColor whiteColor];
    self.dpEventAlias = @"login";

    self.senseBot = [[SenseBot alloc] init];
    self.senseBot.delegate = self;
    [self.senseBot useAnimatedAcitvityIndicator:nil withInitialSize:CGSizeMake(100, 100) indicatorType:SEIndicatorTypeSystem];
    [self.senseBot disableSecurityAuthentication:YES];
}

@end
|
至此, DeepKnow已在您的应用中启动。
验证事件发生
给关键场景的视图控制页设置标签
在相应控制页的文件中#import <DeepKnowSDK/DeepKnowSDK.h>, 然后在UIViewController的生命周期中设置DeepKnow场景事件别名
一般用于标记核心控制页面, 比如活动等。 手动设置后, DeepKnowSDK会自动添加的控制页面标签到相应的数据里。
#import <DeepKnowSDK/DeepKnowSDK.h>

...

- (void)viewDidLoad {
    [super viewDidLoad];

    self.dpEventAlias = @"this is a KEY Event";

    ...
}
|
推荐在viewDidLoad处理
提交场景事件的描述以获得调用验证需要的参数
事件发生时, 需要将当前的SenseData数据提交到极验服务器
以登录事件举例
#import <DeepKnowSDK/DeepKnowSDK.h>
#import <SenseBotSDK/SenseBot.h>
@interface ViewController () <SenseBotDelegate>
@property (nonatomic, strong) SenseBot *senseBot;
@end
- (void)viewDidLoad {
[super viewDidLoad];
self.dpEventAlias = @"login";
[self createSenseDataButton];
...
}
- (void)createSenseDataButton {
UIButton *button = [[UIButton alloc] initWithFrame:CGRectMake(20, 96, 72, 44)];
button.backgroundColor = [UIColor blackColor];
button.layer.cornerRadius = 3;
button.titleLabel.text = @"登录";
[button addTarget:self action:@selector(login) forControlEvents:UIControlEventTouchUpInside];
[self.view addSubview:button];
}
- (void)login {
...
[[DeepKnow sharedInstance] emitRecentSenseDataWithGTID:@"<!-----申请gt_id-----!>"
interactive:1
attribution:@{@"gender" : @"male", @"member" : @"false"}
completionHandler:^(NSDictionary * _Nullable dict, NSError * _Nullable error) {
if (dict && !error) {
NSLog(@"dict: %@", dict.description);
SEIntent *intent = [[SEIntent alloc] initWithDict:dict];
if (intent && [intent.product isEqualToString:@"sensebot"]) {
[self.senseBot showWithIntent:intent animated:YES];
}
else {
NSLog(@"dict: %@", dict.description);
}
}
else {
NSLog(@"error: %@", error.userInfo);
}
}];
}
|
处理SenseBot返回结果
遵循SenseBotDelegate代理, 处理验证返回的结果和错误
@interface ViewController () <SenseBotDelegate>

@property (nonatomic, strong) SenseBot *senseBot;

@end

@implementation ViewController

...

- (void)senseBotDidReceiveResponse:(SEResponse *)response withError:(SEError *)error {
    NSLog(@"error %@", error.seDescription);
    if (response && [response.code isEqualToString:@"1"]) {
        NSLog(@"result: %@", response.result);

       // TODO
       // 请进行二次校验
    }
    else if (error) {
        // error 处理
    }
}

@end
|

 English